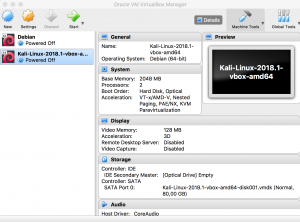
Ethical Hacking Week 10
This week we are going to make a website that will be used for phishing and the tool that we are going to use is SET which is already installed in the kali linux. This purpose of this tool is to get the username and password information of the person being attacked.
First, enter the command to start the tool![]()
Read the agreement and type ‘y’ to agree. Keep in mind that this tool should not be use for evil and doing so will violate the agreement.
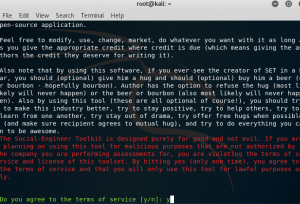
You will then see the main menu of the tool.
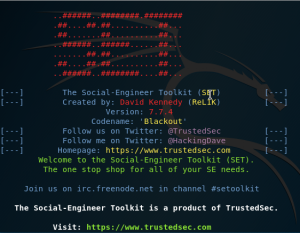
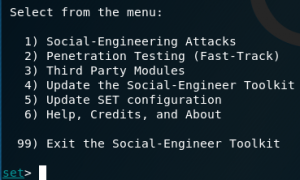 From here, proceed by typing ‘1’ which will enter the ‘Social Engineering Attacks’ menu.
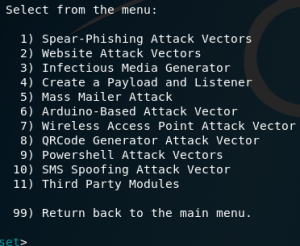 Here is the ‘Social Engineering Attacks’ menu. Now type in ‘2’ to enter Website Attack Vectors
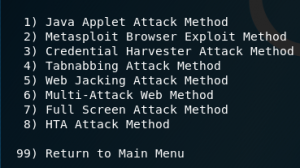 Then choose ‘3’ to go to ‘Credential Harvester Attack Method’. Here is the description of ‘Credential Harvester Attack Method’. There are also other explanation about other attacks in above this menu.
![]()
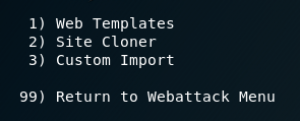 You will then see this menu. click on Site Cloner.
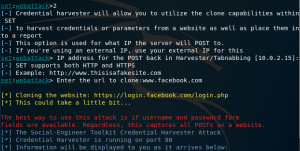 You should then see a similar page. This shows what my ip address is which is 10.0.2.15 and we can enter what url we want to clone. I chose to clone www.facebook.com. If you are asked if you want to disable apache type ‘y’ otherwise the tool will crash and you will have to try again from the beginning.
![]() Once you see this line, you can open the ip address and see the clone website.
Once you see this line, you can open the ip address and see the clone website.
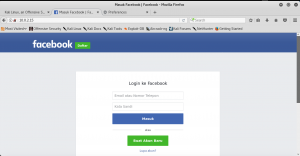 Open your browser and type in the ip address. You can see i have successfully cloned facebook. However, if you look closely on the url, it is the ip address not facebook.com. Lets try putting in the email and password
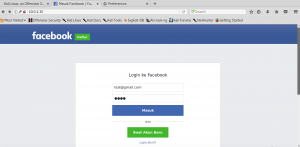
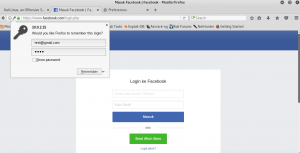 Once i have input the email and password, it redirects to the real facebook.com. This will create the illusion that there have been an error on the part of facebook and people would type in their email and password again not suspecting anything. But what they did not know is that i have already obtained their email and password and i can view it from the terminal.
![]()
This is how a hacker can obtain information about a user from social engineering. In order to avoid this, always check the url of a website before putting in any information. And do not trust an email from a sender that you do not know. Lastly, stay away from spam email as much as possible.
Ethical Hacking Week 9
Now that we have successfully installed DVWA, we will learn how to use this tool. First thing that we have to do is start the apache2 and mysql service. If you read this part after you just installed DVWA, you do not need to start the services again.
Now open the browser and enter localhost/login.php. You will see a page asking for a username and password.

By default, the username is ‘admin’ and the password is ‘password’. Click Login and you will see the DVWA homepage.
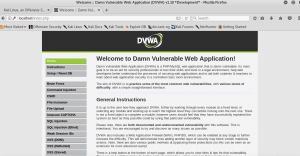
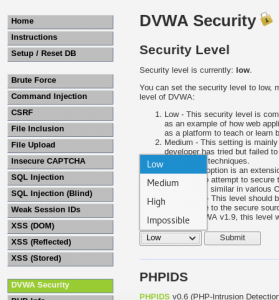
Now we can see methods that we could try such as “Brute Force”, “SQL Injection”, and many others, but before trying different methods, we need to set the level of security. Click the DVWA Security and set it to Low.
Command Injection
Security Level: Low
Now let’s use “Command Injection” and see the following page.
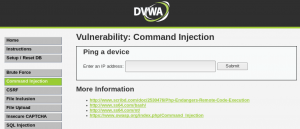 Try entering an ip address. (I used google.com)
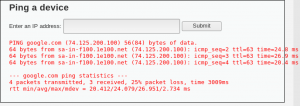 you should see the result of the ping. Now we know that the this is similar to using the terminal and using the command “ping www.google.com”. Now lets try finding the user ID. With the unix command we will be using “ping www.google.com; id”. so lets try putting in “www.google.com; id” in the text box.
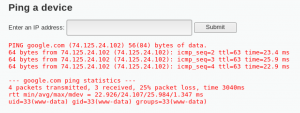 We can see the result and find our user ID which is 33. Now click the “View Source” button on the bottom of the page to see the source code.

Security Level: Medium
Now lets change the security level to medium and try the same command again. You will find out that it will not give you any result. Click on the “View Source” button at the bottom of the page.
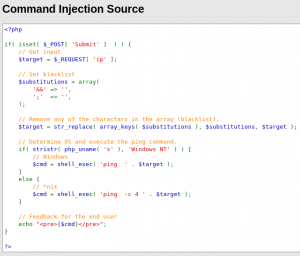
We now have a set of blacklisted character which means that character of ‘&&’ and ‘;’ is blacklisted and removed. This means that the command that we use is not “ping www.google.com; id” but “ping www.google.com id”. Lets try placing that command on the terminal.
![]() The command failed.
The command failed.
So what can we do? Since we know that ‘&&’ and ‘;’ is blacklisted, we should use other character other than ‘;’. Lets try “www.google.com | id”.
 We now get the id without using ‘;’ character. This solves the Medium level security.
Security Level: High
Turn the DVWA security level again to high and place the command “www.google.com; id” to use the ping service. The result is missing again so lets check the source code.
 The number of blacklisted character increases. Now it seems that you cannot obtain the result. However, if you look closely at one of the blacklisted character of “| ” you can see that the character in there is ‘|’ and a blank space. Lets go around this by using “www.google.com|id”. Place the id next to the pipe. It should work as terminal does not care whether there is a space or not.
 We can see that the ping works and we have solve the hard level DVWA security level.
Ethical Hacking Week 8
This is week we learn about one of the step in hacking which is social engineering. Social engineering is the act of information gathering by way of communication. There are several ways to gather information through social engineering. One of the way is to befriend someone who works at the place you are targeting. When you befriend someone and make them trust you, they may sometimes unconsciously slip up and tell you confidential information about the company. Even small things such as knowing the name of the higher up can be a good information, one of the way to use this is to pretend that you are assigned to one of the projects given by this higher up. We also learn the difference between interviewing and interrogation. In interviews, the person being interviewed acknowledge that they are interviewed and has set up a meeting beforehand while in interrogation, the person interrogated does not schedule the interrogation beforehand. They may get violated physically sometimes and they do not agree to be interrogated.

Today we learn about a hacker called Kevin Mitnick
Social engineering can also be used to escape danger, such as Kevin Mitnick who was once a hacker and imprisoned for 5 years due to his hacking activity. He uses his own social engineering skill to escape the FBI once, by saying that the person the FBI searches for is not him and that he can prove it by checking the mailbox name. He is also known to hack communication device that allow him to be one step ahead of the FBI. He is now a computer security consultant to the government and an author. He also creates a security firm called Mitnick Security which help test company’s security and seek potential loopholes. This is Kevin Mitnick
Here is a video of a live hacking he does to intercepts and read an email.
Ethical Hacking Week 7
This week we are going to be installing DVWA (Damn Vulnerable Web Application). What we need to do first is download the DVWA archive.
![]()
Once we have done installing it, move the file to a directory that is easier to read.
![]()
give permission to write and execute the folder.
![]()
Now lets create a database and an account, enter these two commands and click enter when asked about the password as the password for root is blank, then enter the commands to make the database and account.

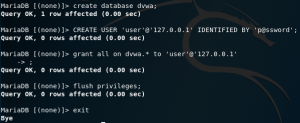
Once that is done stop the mysql server
![]()
To install dvwa you will need php module that do not exist in kali linux which means that you have to install it. Use the following command to do so
![]()
![]() (If you are using php v7 then apt-get install php7.0-gd)
(If you are using php v7 then apt-get install php7.0-gd)
![]()
Now write this in the command to edit the database. Edit the database to add captcha keys for your database
![]()
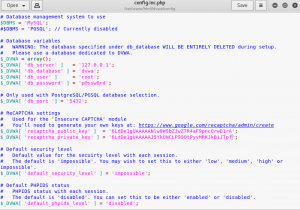
We are almost done, now edit the main config file using the command below (The location of php.ini is different according to the version of php)
![]()
![]() Change the line of “allow_url_include” to On.
Change the line of “allow_url_include” to On.
Start the server and database
![]()
Open localhost/dvwa/setup.php in the browser
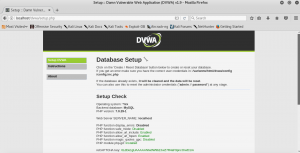
Check the DVWA installation here. Click the “Create / Reset Database” button you will be redirected to the login page. Enter the credential and you are ready to use the DVWA!
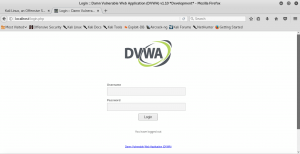
*By default the username is ‘admin’ and password is ‘password’.
https://medium.com/@TheShredder/create-your-ethical-hacking-environment-install-dvwa-into-your-kali-linux-4783282dea6a
Ethical Hacking Week 6
In this week, we are learning about port scanning. Firstly we learn that the port from 0-1023 is also known as a well-known port. Next, we learn that the best way to learn port scanning is to practice it. Vulnerabilities can only be found in an open port, and by using port scanning we look for open ports, closes ports, filtered ports (Ports behind a firewall) and best-guess assessment of OS.
A few port scanning tools is nmap, nessus, and zenmap. Zenmap is nmap with user interface.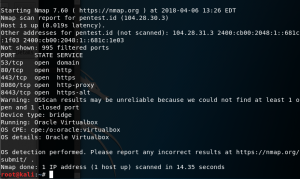
Here is an example of nmap tools being used to scan a web for open ports.

Here is an example of zenmap, it is nmap tools with user interface.
Next we learn to send ICMP echo request using hping command.
“Hping 3 –p <ip> -p 8081 –a 8.8.8.8 –S” is a command to send ICMP request to a device.
There are different types of scan when doing port scanning:
- SYN Scan (Most Common)
- Connect Scan
- NULL Scan
- XMAS Scan
- ACK Scan
- FIN Scan
- UDP Scan

Above is a wireshark scan of when my computer is ping-ing a 1.1.1.1 server which is a cloudflare DNS server. We can see that the computer is sending a ICMP packets of type 8 and code 0 to the server. And we get a ping reply of type 0 and code 0.
Next we try to send a SYN scan to pentest.id by using the command below “nmap -sS pentest.id”
![]()
and we can see the result of the wireshark scan in the image below. We can see how we send a SYN packet and receive a ACK packet in return. Once it has been accepted we send a RST packet to end the process.
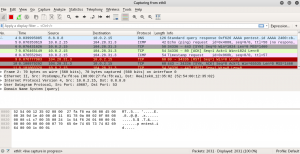
Ethical Hacking Week 5
It is week 5 of the ethical hacking class, and this week we learn about enumeration. Enumeration is one of the process in hacking. This is the process where the attacker uses tools to find information about the victim.
This week is about BASH SCRIPTING. First, we need to create a bash code and execute them. ![]()
Then once in the leafpad, insert the first line “#!/bin/bash“. This indicates that we want to use the bash shell interpreter. Now lets echo out a string and save it. You should now have something like this.
Now when you try to run it in the terminal you will not have the permission to execute it. what you have to do is give it permission with this command ![]() . Execute the file again. You should see what you wrote:
. Execute the file again. You should see what you wrote:
![]()
Now lets add “ifconfig” command to the bash_ex.sh file.


Now you can see how you can run a command by writing it in the leafpad.
Lets use this lesson to nmap a certain ip address. First create a variable that will read the the web you want to nmap and which port. Once you are done, you should add the nmap command with the variable and it should look like the image below.
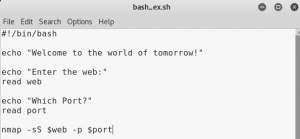
What the program is going to do is ask for the input of web and port variable. Then it will use the variable to send a SYN scan to the web.
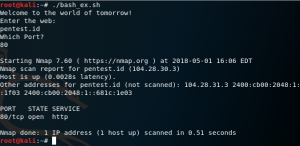
You have now done an nmap with user input!
Ethical Hacking Week 4
One of the most interesting lesson that i learn today is to make an exact replica of a website to get a user information. Mr. Kalpin our teacher that day show us how to duplicate a website. He duplicate a famous banking website in Indonesia, and show us how to attain the information of the user. When opening the website, the user will insert their information to the website which will then be given to us, and the website will redirect to the original banking website. This will make the user think that he/she has entered the wrong information and will not be suspicious of what happens.
I learn that to prevent this scam, everyone should always check their link when opening a website, be it from a known person or not. Because if they are not careful, they will send their personal information to a hacker which can then be used for many purposes.
Aside from that, we also learn to find the real ip address of a website that is given a front ip by cloudflare. One way to do it is by using crimeflare. Using this tool we will be able to find the real ip of a website.
We also learn to use a tool called DNStrails which can be used to find historical data about a website, the subdomain of the website. Another website similar to this website is robtex.com, the website can also be used to do various research on a website.
 Here is the front page of DNStrails.
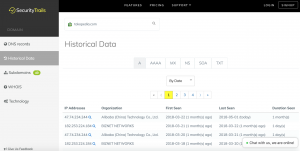 And here is the page that will appear once we search a website.
Lastly, i learn how to track an original location of an email via the ip address (in Gmail). First after opening the email, click on the message that you have received, then dropdown to “Show original”. After it is done, use control+F to search for a keyword which is “Received: from”. Once it is done, you will be shown the private ip address and the real ip address of the sender
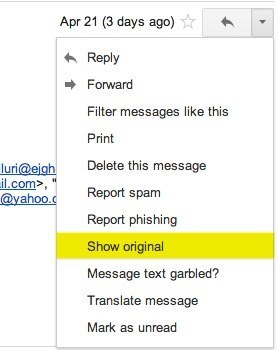 Dropdown and click “Show original”
![]() After searching, you will find the ip address
After searching, you will find the ip address
Another thing we learn about is viewing old webpages of a website. One way of doing this is by using archive.org.

This is the homepage of archive.org you can search the old pages of a website here.

Once we find a web, we can search for the pages in a specific dates. In this case, i’m searching for the pages of tokopedia in 8th April 2013

References
Kishore, A. (2013, April 24). How to Track the Original Location of an Email via its IP Address. Retrieved from Online Tech Tips: https://www.online-tech-tips.com/computer-tips/how-to-track-the-original-location-of-an-email-via-its-ip-address/
Ethical Hacking Week 3
In today’s session, we further learn to gather information.
In the beginning, We use the command prompt and uses the command dig and host to find information about a website. I also find out about my version of kali linux by using the command “uname -a”,
![]() “uname -a”
“uname -a”
my kali linux is version 4.14.0 . Next, i search for the founder of linux, and it is a man named Linus Trovalds. He is born in Finland on 1969. He made the first Linux prototype in 1991 and the version 1.0 of linux is released in 1994.
 Linus Trovalds
Using the host and dig command i was able to find the ip address of a domain, and using whois command allow user to search for the people behind the website.
 Host Command
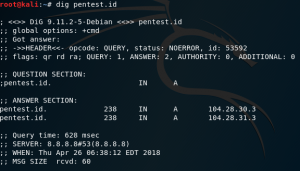 Dig Command
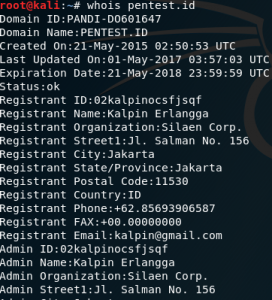 Whois Command
We also learn about an information to gather information on a person, one of the website used to do this is pipl.com.


We also know that Google can be used for hacking, by using Google dorks, we will be able to get some sensitive documents and informations.

Here is a link to know more operators to use:
https://null-byte.wonderhowto.com/how-to/use-google-hack-googledorks-0163566/
Before the class ends, we get another test. The test is fortunately open book but it is still difficult to complete. The test is about gathering information from a website by using all the tools that was learnt that day.
Ethical Hacking Week 2
In this week we learn about the penetration testing methodologies, Undang-undang Informasi dan Transaksi Elektronik, as well as ways to analyze a company’s website.
We learn about a few penetration testing methodologies such as:
- OSSTMM(Open Source Security Testing Methodologies Manual)
- OSSTMM is about operational security
- It is about knowing and measuring how well the security works
- OWASP(Open Web Application Security Project)
- Is focused on improving the security of the software
Next we learn about the law from the UU ITE. Not all places in the world have the same rule, hence we need to understand what is legal and what is illegal in every country. Some countries might consider having the tool to do port scanning is illegal while some countries allow the use of port scanning. Punishment for breaking the law is serious which is why we have to understand what the law is before doing anything wrong.
Next, we learn about ways to analyze a website. There are a few tools that is available to do it such as WhoIs which can be used to gather ip address and domain information. Another tool is the paros proxy, a website reconnaisance/vulnerability scanner used for getting vulnerability for a website. Whois command
This week i have already downloaded the Kali Linux and have gain access to the paros proxy. I first change the proxy configuration in the browser so that it utilize Paros as a proxy.
I used firefox in kali linux and click on the “preferences” tab of the browser.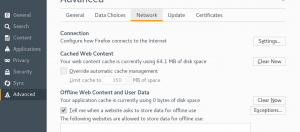
Then go to the page above by clicking the Advanced setting and go to Network tab. and click on the “settings” button on the “Connection” part.
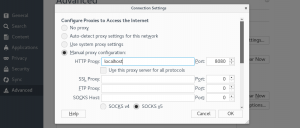
You will see the page above and you need to change the proxy setting from auto-detect to manual proxy configuration. and set the setting as above.
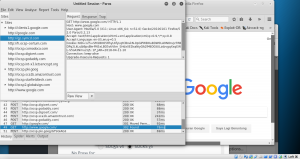
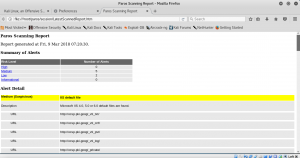
After it is done I visited a website, I can then see things like “GET http://www….”, the host, and many other. From the analyse tab i clicked on scan all. It took a while but after it is done, i click on the report tab and click last scan report. fI used the terminal to go to the report directory which is located in /root/paros/session and open the file in firefox by using the command “firefox <filename>”. There I can see the report from the paros scanning.

Lastly, before the class ends, we got a closed-book quiz based on what was taught that day and it was difficult.
Ethical Hacking Week 1
This is the first day of ethical hacking course, we learn about the work of an ethical hacker.
Ethical hacker is an individual who perform penetration testing with the owner’s permission. Unlike hackers or crackers, ethical hacker follows the rule of the law.
Penetration testing is a legal attempt to break into a company’s network to find their weak link.
There are a few models for penetration testing:
- White box model
- This model makes it easier for the tester to do their job
- Tester are told everything about the network topology and technology
- Tester is authorized to interview IT personnel and company’s employee
- Black box model
- Company’s staff do not know about the test.
- Tester is not given details about the network
- Is used to test security personnel if they are able to detect an attack
- Gray box model
- The tester is given partial information
- Which is why it is a hybrid of white box and black box model
The homework for today is to learn about the law on ethical hacking in Indonesia by reading the ‘Undang-Undang Informasi dan Transaksi Elektronik’
How to install Kali Linux in a virtual machine:
- You need to install a virtual box inside your computer
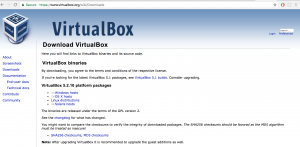
- Click on the host to install the package:
- Click windows host if you are using windows or click OS X host if you are using Mac
- Once the virtual box is installed go to “https://www.kali.org/”.
- Go to the Download tab and you will see another page like below
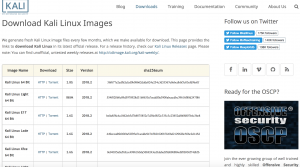
- You can then see the different versions of kali
- Download one of the kali (Mine is the Kali Linux 64 Bit which is 2.8G)
- Once the download is done, run the file it should redirect you to the virtual box
- Follow the instruction and then you will have your kali linux!
